I mentioned a couple of months ago that I was looking for a new flatbed trailer to augment my BOB Yak for use in the city. Armed with my requirements, I headed down to Urbane Cyclist, fully expecting to ride away from the store with a new Burley Flatbed or equivalent. But after considering the options and talking to the staff about my needs, they recommended that I either get a DIY trailer kit from Wike and build my own trailer, or call Wike and get a custom trailer built to my specifications. I opted for the former, and am really happy with the result.
It’s done duty twice so far: its inaugural trip was ably carrying three Rubbermaid totes crammed full with much of the equipment and materials required for the Ward 29 Bikes meeting two weeks ago, and it pulled 80 lb of cat litter home last weekend. It’s big enough to be used for flats of flowers, bags of soil, and many other large or awkward loads that would have overwhelmed or overflowed my Yak.
Read below the fold for more details about the construction.
Requirements
My requirements were actually fairly simple: I wanted a large flatbed trailer that could take virtually any odd-sized load that I’d want to throw on it. The two specific applications I had in mind were carting home a rain barrel from one of the city’s Community Environment Days, and hauling a good-sized load to the local Goodwill. A larger trailer would also be handy for many other regular tasks: fetching bags of cat litter, bringing home flowers and plants at the beginning of gardening season, and carrying most large purchases that I’d otherwise have delivered. My BOB Yak can do some of those things, but it’s better suited to long-haul riding rather than carrying random loads of stuff around the city.
All of the flatbeds I saw at Urbane were smaller than I would have liked. The Burley Flatbed was closest, but it still wasn’t quite what I was after. So I ordered the Wike DIY kit the next day and started work.
Design
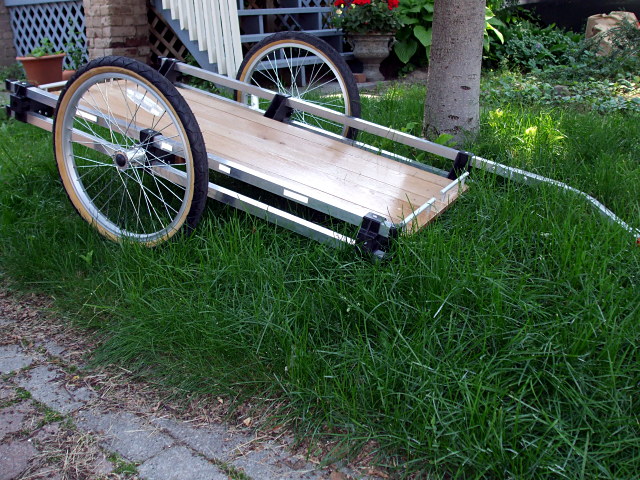
I considered a few layouts before picking my final size: 2′ x 4′. That’s big enough to hold three of those ubiquitous Rubbermaid Roughneck totes. I’d originally hoped for a trailer big enough to hold four totes, but it would have been huge and far less practical for smaller loads.
Materials
In addition to the Wike kit, I used the following materials:
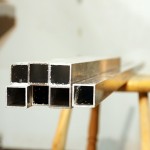
1″ square aluminum tubes:
- 3x 48″ for the sides
- 1x 53″ for the side piece that connects to the tow bar
- 3x 24″ for the crosspieces
5x Red oak slats, each roughly 5/8″ x 3″ x 48″
3x Red oak crosspieces, each roughly 3/4″ x 1″ x 20″
50x pop rivets (could also have used bolts or self-tapping screws)
6x #10×1-1/2″ self-tapping screws
7x end caps for the aluminum bars
4x 160mm aluminum bar handles for front and rear tiedowns
Tools
Power driver (optional, but it’ll make your life much easier)
Drill press (optional)
Screwdriver, rivet tool, and/or wrench to drive your chosen fasteners
Gotchas
Building the kit is fairly straight-forward, but I’ll offer tips based on my experience:
- The documentation with the kit recommends making the arm that connects to the tow bar 8-12″ longer than the others. About 3-5″ in addition to the supplied tow bar is more reasonable. Do a dry fit and make sure that your rear wheel has adequate clearance.
- If you don’t have a drill press, just use #8 or #10 self-tapping screws instead of pop rivets. I wanted the cleaner look of rivets, but I’m not sure about how durable they’ll be. If they start shearing, I’ll replace them with self-tapping screws.
- I had to grind down the tang on the tow bar supplied with the kit so that it would fit into the tubes that I bought.
- 1″ square aluminum tubes should be available at any halfway decent hardware store. I got mine at my semi-local Metal Supermarket. They cut your order to length for free and I didn’t need to make any adjustments to their cuts.
Depending on the material and finishing touches you use, you can have a large custom cargo trailer for under $200. The kit saved me many hours I would have needed to spend in the shop if I was building the trailer from scratch.
Here’s a partial gallery showing the building process and result.
-
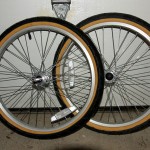
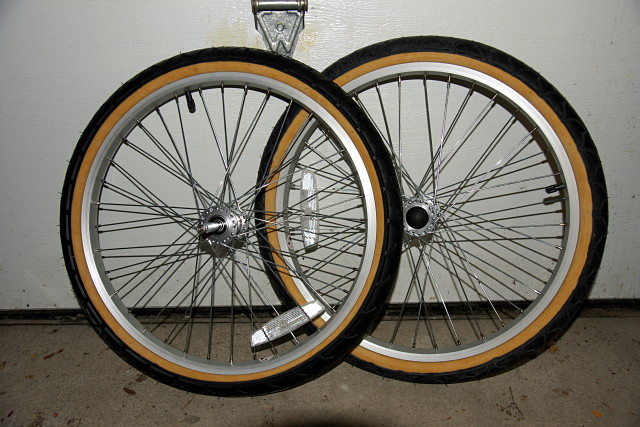
- Two quick-release wheels came with the Wike DIY trailer kit
-

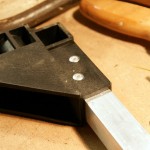
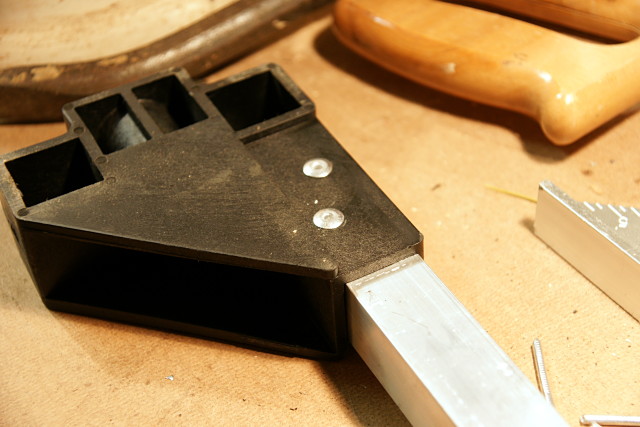
- The rest of the kit contained six connectors to help construct the trailer, a bike hitch and pin, and a tow bar to connect the trailer to the hitch. It seems minimal, but this the kit contains basically everything you need to build a trailer, including all of the hard parts. With this kit, you can finish a trailer without any specialized tools beyond maybe a drill.

-
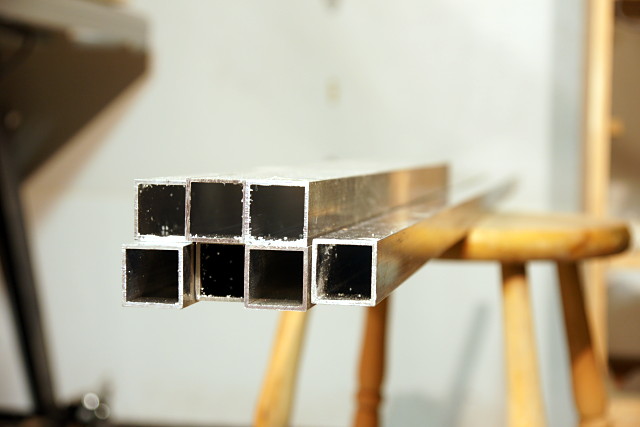
- Start with seven lengths of aluminum tubing
-

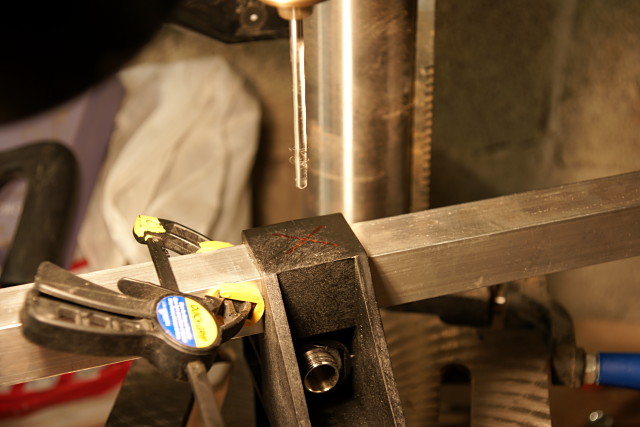
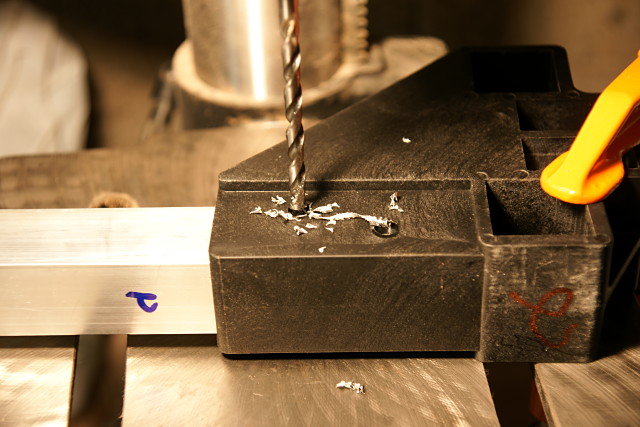
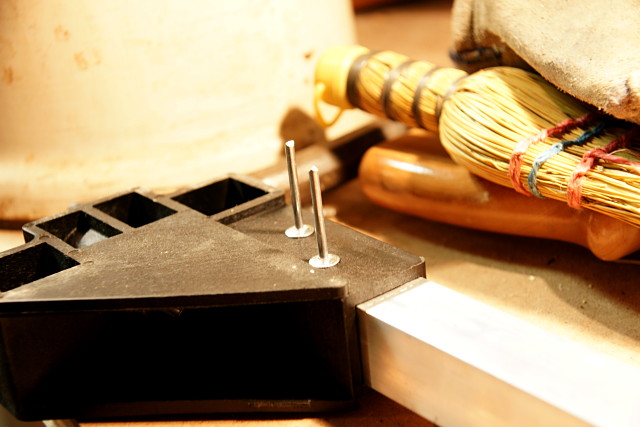
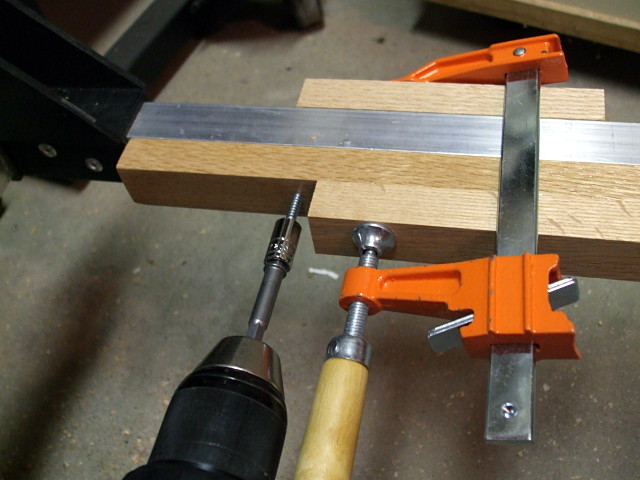
- You need to drill holes in the brackets for both the top and bottom tubes that run the length of each side of the trailer. If you use self-tapping screws rather than pop rivets, you don't need to drill.
-

- The brackets are already drilled to secure the crosspieces. I drilled out the crosspieces for pop rivets, but if you're using self-tapping screws, you won't need to drill at all.
-
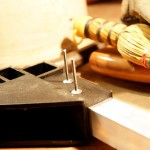
- Insert a pop rivet into each hole in the bracket and tube.
-
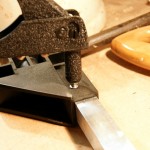
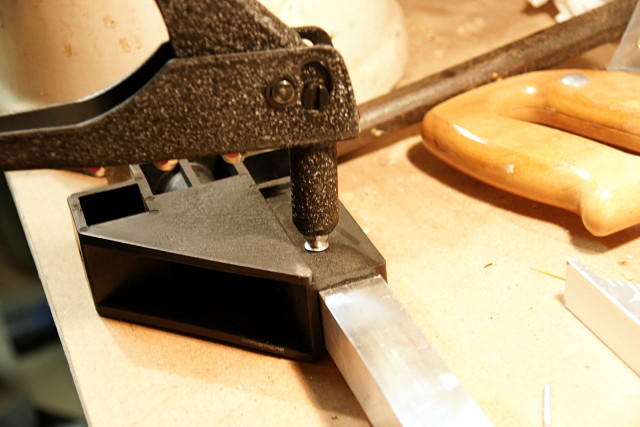
- Use the pop rivet tool to, uh, pop each rivet into place, securing the joint.
-
- Two pop rivets have been installed here.
-
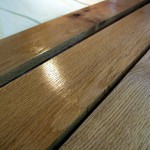
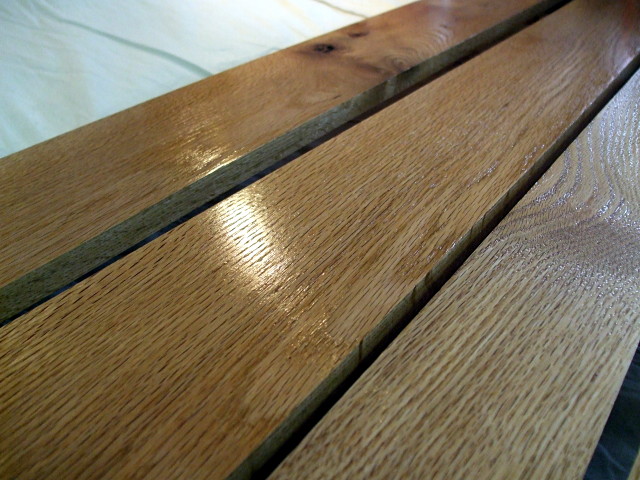
- I chose red oak for the trailer bed, largely because I had some lying around from a previous project. I planed it down to 5/8" to keep it light. If you‘re using a softer wood, you should keep it a bit thicker. Here, the slats are drying after a second coat of Varathane. Cedar would also be a good choice for the bed, as would a plain old sheet of exterior plywood. If you don't have a saw, you can take your trailer to Home Depot, have them cut a piece to size, and you can carry it home on your trailer to finish assembly. You can use pretty much any hard-wearing exterior finish here, including paint or tung oil. If you really want shine and a bullet-proof finish, try marine spar varnish. But it‘ll cost you.
-
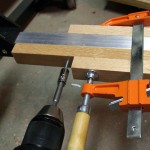
- Connect the wooden crosspieces to the aluminum crosspieces with #10 self-tapping screws.
-

- The wooden crosspieces have been mounted to the frame and are ready for the slats to be fastened. I chose this design rather than attaching the slats directly to the aluminum crosspieces because it means that the entire bed is attached to the trailer frame with only six screws, greatly easing any future replacement or maintenance.

-
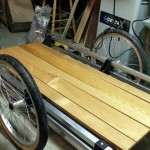
- The oak slats, dry after a third coat of Varathane, get a dry fit before being secured to the trailer frame.
-
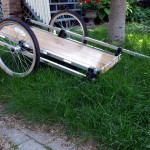
- With the addition of some cabinet handles from Lee Valley Tools to provide front and back bungee tiedowns and some resistance against items rolling off the trailer, we're done.
-
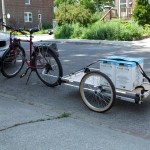
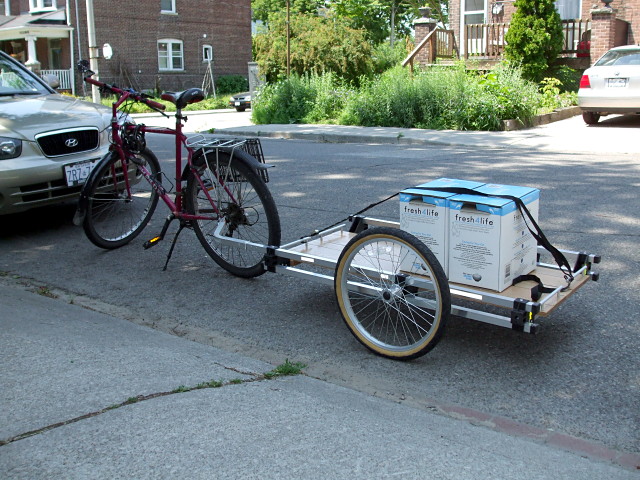
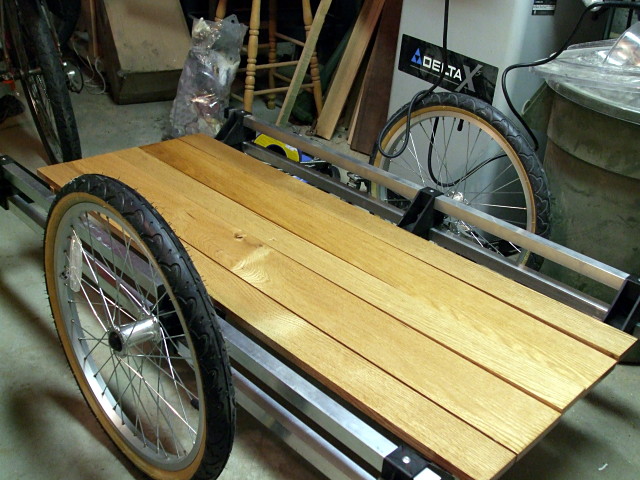
- The new trailer easily carries two 40lb boxes of cat litter, twice what I would usually carry on my BOB Yak. I could easily have carried a third without approaching the load limit.
Essentially, this project seems to be for the benefit of your feline companion(s?). Hauling litter features prominently.
Inquiring minds want to know how many two-fours of beer this baby could handle.
BTW, those are very good photo instructions. Even a ham-donny like me could follow them.
Well, big boxes of cat litter are something I buy regularly that I can’t just lug home on foot or bungee onto my bike rack. After Pet Valu moved from 30 lb boxes to 40 lb boxes last year, I was only able to carry one box at a time on my Yak, which made it less practical to use a trailer rather than pop over with the car. It was definitely one of the primary requirements that convinced me to consider getting a bigger trailer.
As for the beer, Wike gives their kit a carrying capacity of 150 lb. If a 2-4 weighs about 25 lb, that would be six cases. Perhaps more importantly, it can carry at least a two-month supply of Haagen Dazs.
It looks to be sturdier than the Burly trailer too
I’m adding this to my cargo bike (Kona Ute). See any modifications that would need to be made given the different dimensions of longtails? Perhaps just tweak the tow bar?
Because it connects to the bike at the rear axle, the length of the tow bar is determined primarily by the size of your rear wheel. Looking at the Kona Ute, you may want a bit of extra clearance because of how far back the rear rack extends. The best approach is to do a dry fit and see what you prefer.
I like that trailer, it looks like you could do some serious carrying with it.
ttp://picasaweb.google.com/EDixon250/NewBoldGoldTrunk?feat=directlink
Check this out.
Hello Val,
Very nice trailer, I don’t see where the cross members are. I understand where they are under the long slats U just can’t see them in any of the pictures.
What do you think it weighs?
Scott
The crosspieces are shown in two of the pictures toward the end (numbers 10 & 11), before the oak slats are fastened to them. The wooden pieces are attached to the aluminum bars with self-tapping screws.
The whole thing weighs about 30 pounds. That’s a bit more than twice the weight of my BOB Yak trailer.
Hi, Val:
Thanks for all the helpful information you’ve provided on your Wike. I just received my DIY kit and am now planning my construction, but would like to ask you a few questions first:
1. What’s the thickness of your aluminum square tubing? Wike told me that the 150 lb. capacity is what the axles/wheels can withstand, not about the framing. Still, I wonder whether 1/16″ will do or whether I should get the stronger (and heavier) 1/8″ tubing. I want the option to carry very heavy loads but I don’t want the thing to weigh a ton.
2. Did you consider other materials/options for the trailer bed? My plan is to use a single piece of either aluminum tread brite or a suitable thick piece of all-weather plastic and mount it with the connectors turned “upside down” so that I have one large 2′ x 4′ flatbed with no gaps on the sides. Then I’m thinking of adding some more tubing and plastic connectors (such as those sold by Esto: http://www.estoconnectors.com/) onto the flatbed to create a fence to keep my cargo contained. (Again, I’m trying to keep overall weight in mind.)
Speaking of Esto, their 1-inch “hexagon connector” (http://www.estoconnectors.com/index.php/connectors/detail/pn-532306/) could serve as a nice mount on the front of the trailer for a removable pull handle using another piece of aluminum tube bent at 135 degrees of about 30-36″ (like a longer version of the trailer arm).
3. Have your ridden in the rain with your trailer? If so, has not having fenders on it posed a problem with excessive spray? Any other weather-related issues you’ve encountered?
Hope you’re still enjoying your Wike; I’m looking forward to getting mine completed and on the road.
George P.
I used 1/16″ wall tubing; it’s plenty strong enough. In my informal and basic testing, a 4-foot tube supported at the ends was able to support my weight (a lot more than 150 lb) in the middle. It flexed, but didn’t buckle or permanently deform. I figure that the three short transverse tubes that carry the bed and the four lengthwise tubes that transfer the load to the wheels are more than strong enough to carry anything I’d realistically want to pull. It’s also worth noting that the tongue assembly supplied with the Wike kit probably won’t fit into 1″ tubing with a 1/8″ wall.
I considered all kinds of materials for the bed, ranging from plywood to aluminum grill. I went with oak primarily because I had some extra lying around and really like the way it looks.
My very first loaded ride with the trailer was in the rain and I had no problems with spray at all. The wheels are far enough back and out to the side that neither I nor the cargo is in the spray zone. If it was a problem, I’m sure it wouldn’t be too hard to mount a couple of fenders from the side tubes.
Howdy,
That is a pretty inspiring trailer you have there. I hope that mine comes out as nice. I was wondering if there is a maximum width limit? I’d like to build one to tow my kayak with and would need at least 27″ in between the rails.
The width is pretty much up to you; I don’t think an extra 3″ over my cargo bed width of 24″ would make that much of a difference in handling, but it would probably feel considerably wider on the road. For my own design, I originally wanted a cargo area 36″ wide, but a mockup clearly showed that the resulting trailer would be unwieldy to pull and manoeuvre.
Val:
Just wanted to pass along another thank-you for the information you’ve provided on your trailer. It helped me out a lot during the planning and construction of mine. Here’s a link to my finished product:
http://www.biketrailerblog.com/2010/05/diamond-plated-beauty/#more-1454.
George,
Nice job with the diamond-plate and those rails are nice too.
Did you use 062 or 125 for all the square tubes?
Did you use 10 gage (0.1 Inch) diamond plate?
It looks pretty expensive ($64 for 2x4x.1) and I wonder how 14 gage (.062) would hold up.
Also, where did you get the upright tubes with the two perpendicular tangs for bolting?
Michael,
The black square tubes are all 1″ .065 diameter (grooved interior) from Esto Connectors joined using their black nylon connectors (base, right angle, tee, and end cap connectors). However, for the center transverse tube I opted for a 1″ .125 aluminum tube (from Online Metals) for extra strength.
The diamond plate is .1″ and in retrospect is pretty heavy duty for a trailer, but I didn’t want to take any chances. A .062″ plate would likely work just fine unless you’re hauling anvils around. Online Metals now also offers a .08″ thickness plate, which might be a happy medium.
The upright tubes are the same Esto tubes as those mentioned above and are secured to the aluminum plate using Esto right angle and straight base connectors. The nice thing is the whole rail assembly can be removed in case I need to haul something oversized and secure it using bungee cords.
Overall, it was an expensive undertaking, but worth it because I got the aesthetic look I wanted and the heavy duty functionality too.
George: do you still have pics of your trailer you can share? I’d like to see your work.
Thanks
Beautiful tailed. Good work. Why didn’t the tow bar fit into the AL square tubing? Was it not sized right? How much grinding did you have to do?
Either the tongue on the tow bar was just a shade too big or the ID on the tubing I bought was just a shade too small. After spending an hour pounding the two pieces together with a mallet and only getting the tongue about 2″ into the tube, I figured that adding a power tool into the equation would help. It took about 5 minutes with a belt sander to get the pieces to go together snugly but easily.
Hi Val,
I’ve been trying to settle on a trailer for my bike for some time now and stumbled across your DIY kit from Wike. Really beautiful trailer! I think I will probably put some coin aside and order the kit soon. I was considering the BOB Yak, but I think I have settled on a two wheel trailer that can prefer multiple duties, as well as being able to manage two small dogs from time to time.
I have a few, questions I was hoping you could answer.
First, how does it “centre” on the bike (is it a little more to one side than the other)? I am assuming width on the design will play a factor in this due to how the arm attaches to the bike. I am considering making my trailer no wider than my handlebars on my bike.
Would you consider the hitch setup decent? or would you prefer a different hitch setup?
Does the trailer “bounce” when empty? Is the ride better with a load? Would you say there is an optimal load or load placement.
Also, I have seen another Wike kit with the wheels all the way at the back. Thoughts?
Hi Gary,
The width I chose (2′-long cross pieces) puts the trailer pretty much dead centre behind the back wheel. It may be a bit to one side or the other, but not enough to noticeably affect handling. Going any wider would put all of the extra width to the right side unless you bent the tow bar to re-centre the trailer.
I like the hitch; it’s easy to use and has proven to be sturdy and practical. The only minor issue I have with it is that it can be difficult to line up the hitch pin if either the bike or the trailer is sitting at an angle. I was initially worried that the rubber wouldn’t be sturdy enough for heavy loads, but it’s been quite durable. The rubber piece also looks like it’s user-replaceable if it does wear out. That said, I also have a Carry Freedom City trailer and really like the ball-and-socket hitch design that it shares with Chariot trailers. I’d be happy to use the single design for both trailers, but it’s not a priority.
I get very little bounce when the trailer is empty, certainly when compared to a single-wheel trailer. With a two-wheeled trailer, I do experience more of the pull-push sensation when accelerating or braking. It can feel a bit awkward for a couple of seconds.
Putting the wheels all the way at the back will increase the tongue weight at the hitch and will affect handling under load. It’ll also cause the trailer to track farther inside the rear wheel when you’re turning, forcing you to make even wider turns. I can’t think of any advantages to putting the wheels at the back of the trailer. I put mine just behind the centre point because it felt right in my mockups.
When I’m loading the trailer, I just try to keep the weight roughly centred over the axle as much as possible, with a bit of weight on the tongue. Even when the trailer’s fully loaded, I can still easily lift the tow bar up to the hitch. And as long as there’s some weight on the tongue, it won’t ever try to lift the back wheel of my bike off the ground or reduce traction. It’s pretty much like a car trailer; you want about 10% of your load weight at the hitch.
Hey val,
Thanks for the input, just ordered the kit. Still playing around with dimensions in my head but I think I will probably end up close to the same dimensions as yours. Soon as I settle, I’ll make a trip to Metal Supermarket, same as you. Do they carry the endcaps for the tubing or did you purchase those somewhere else? Been looking around and can’t seem to find them in the hardware stores.
I’m not sure if they have the end caps at Metal Supermarkets; I got mine at Home Depot. They’re usually in a little display cabinet near the rod and tubing display.
Val Dodge:
Did you use .062 wall or .125 wall on the aluminum tubing. Looks like the .062 is about half the weight (of course 1/16th inch vs. 1/8th inch). I can get a 21 foot section of .062 locally and that would allow me to build a 24×42. Do you see any trouble going to 42 as opposed to your 48? Looks like it would still handle 3 totes (at 24×16 each).
Also, Wike said if you want to make the load limit of 150 lbs. to go with 1/8th on the axle and tow bar – at least, if not for all tubing. However, that is double the price and double the weight, but I can get a 24 foot section allowing me to build the 48 inch long trailer!
Now you see why my question….
I used .062 (1/16″) wall tubing. As I mentioned above, I tested a single 4 foot length supported at the ends by standing in the middle, and although it flexed slightly, it didn’t buckle or permanently deform. I’ve loaded more than 100 lb on my trailer with no problems and am confident that it could handle 150 lb distributed evenly across the bed. Whether I’d actually want to pull that much weight is another question.
With my length of 48″, there’s a bit of wiggle room left for my three totes, but I don’t think there’s 6″. If you have three totes already, place them together on the floor and measure around them to see how big your bed needs to be. When you’re sizing, remember that the angled brackets will cut into your bed by about 2″ on each side.
Good to know (i.e., about the angle brackets and the .062). Not sure why they spec the .062 in 21 foot and the .125 in 24, but your details on length used has helped me build a spreadsheet and play with the dimensions. The 24 foot length would allow me to go with 48 inch long, but I think it is overkill at .125.
On another note it looks like you went with the steel rims. Wike said I could swap to the plastic, or pay $45 to upgrade to aluminum. I know the steel will rust here in the humidity (Florida) so I will go with plastic or alum. The alum has a button quick connect and the others use a clevis pin. Have you any opinion on the plastic, vs. Aluminum and on the clevis pin?
Thank you for the quick reply and you have a nice site.
I didn’t think much about which wheels to get, but generally prefer spoked wheels to plastic wheels just because they can be trued and repaired, while plastic wheels are disposable. I don’t think it would be a big deal either way for a trailer that isn’t being used for long-distance touring.
The quick-release button is awesome once you’ve used it, but you probably won’t miss it if you’ve never had it. The key question is how often you’re going to be taking the wheels off. If you do it every day, you may appreciate the button release; the clevis pin retainer will do fine if you’re not disassembling the trailer every day.
I did read the follow up posts late last night where you stated you went with 1/16th, but did not remeber them at 6:00 this a.m., so I asked a silly question – i.e., you already answered. Too much time in-between!
Will likely go with the alum. wheels and the quick release as I may be putting it in the back of my van and it would slip under the seats with no problem. Plus, gives me more options to store it in my garage.
Thank for the help.
George P,
How much weight can your trailer hold?
Just wondering how well trailers, especially heavy load trailers work with a standard 3 cross wheel. Some years ago I had issues with wobble in the back wheel (rear carrier with a bundle buggy lashed on). When the rim was noticed to be cracked, I rebuilt the wheel 4 cross. The wobble was gone, but I don’t know if the spoking change made the difference, or if the rim had been cracked a long time. Anybody have any ideas on rear wheel structure for use with trailers?
I know I’m late to the party but if you are still using this website, I’d like to know what you spent on the metal tubing if you recall. I know what the trailer kit costs, I’d like to know what to budget for the square tubing and the red oak. Thanks,
Looks like just the kind of trailer I’m interested in.
Hi I’m also looking to make a flat bed trailer like that.but not as long just a bit shorter.im not good with looking at plans on my phone.any chance I could have the plans and measurements all I need to know.that would be great if can help